In this tutorial, I’ll walk through the steps required to automatically upload a built chrome extension to the web store using the Chrome Web Store API. At the end of the tutorial I’ll provide a bash script that you can plug into your CD tool of choice 🙂
Note: There’s already a pretty good tutorial for doing this available over on the CircleCI blog! Also helpful is Google’s article: Using the Chrome Web Store Publish API. A lot of the commands in this tutorial are actually taken from these resources.
Step 1: Register a Google Developer account.
We’ll need this developer account to publish the first version of our chrome extension (the first version will be published manually) and also to get an OAuth refresh token to store on our CD server.
Head over to the Web Store developer dashboard and make sure you’re signed into the Google account you’d like to publish your extension under.
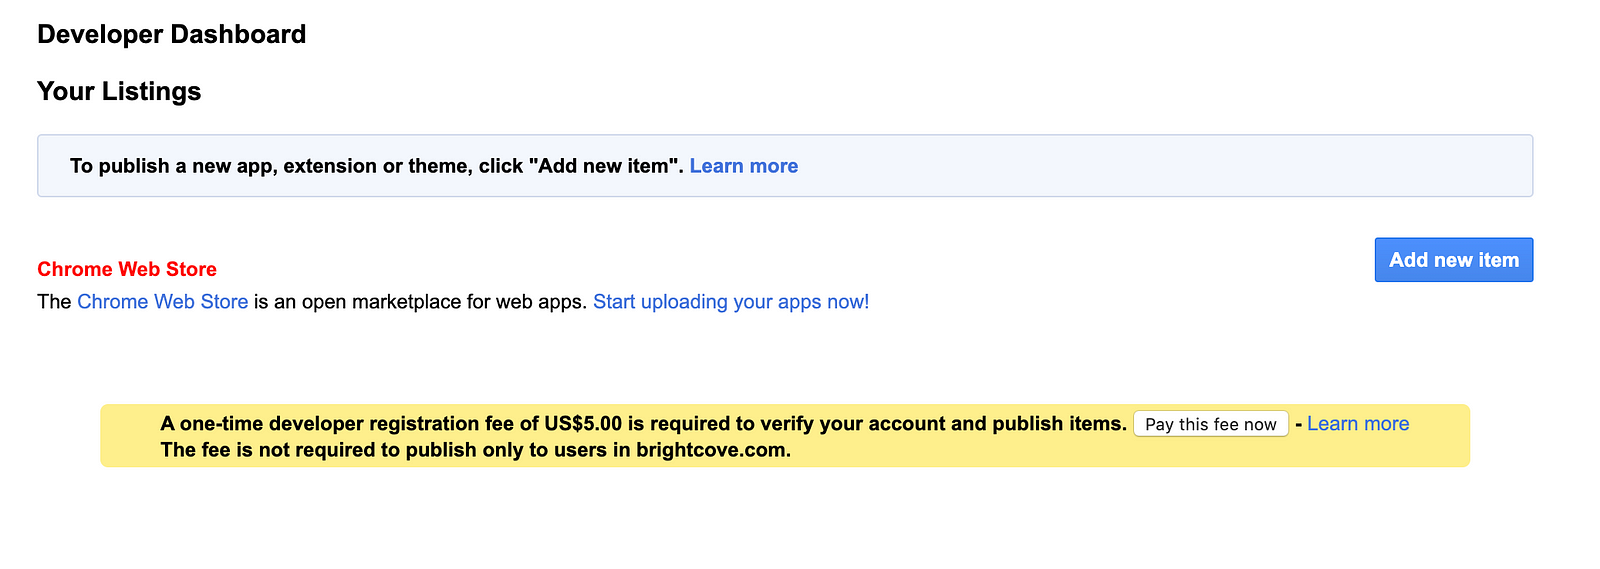
At the time of this writing, there is a US$5.00 fee required if you’d like to publish a public extension. Pay the fee and then you’ll be all set.
Step 2: Add your extension to the Chrome Web Store.
We need our extension to already be published to start our CD so that we can use the extension’s ID in our API calls.
From the developer dashboard, click the “Add new item” button and you’ll be taken to an upload page. Here you can upload a zip file containing your application. The only file that’s required is manifest.json . You’ll be prompted to fill out additional form fields at this time, like selecting a category, possibly uploading more images, etc.
Once you publish the extension, it will take some time for it to pass review and be published to the store. Once your extension is ready, you can get the extension ID from the URL of the extension’s page in the web store. As an example, here’s how you’d find the ID of the “Google Translate” extension.
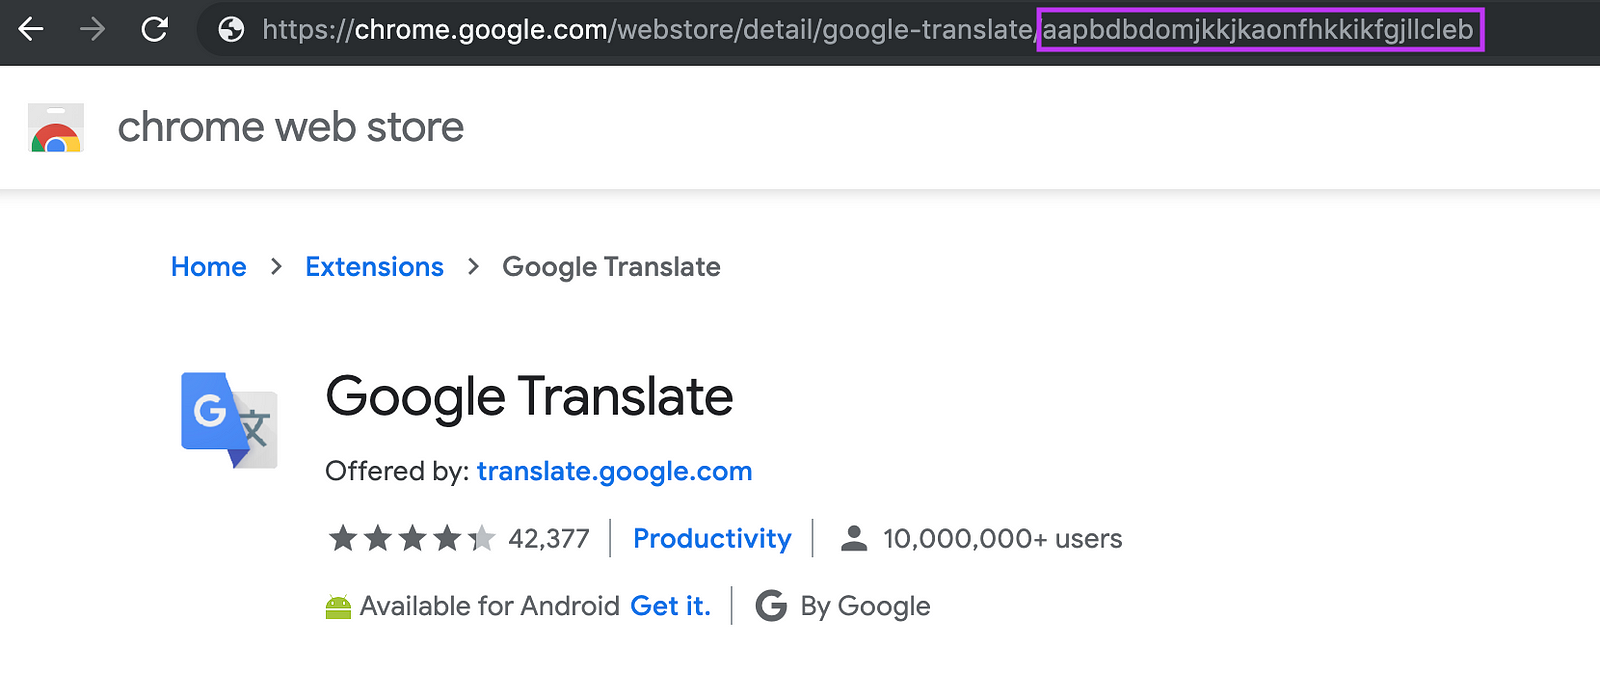
Save the extension ID on your CD server.
Step 3: Set up a Google API Project
We need to set up a new project in Google Cloud Platform in order to integrate with the Chrome Web Store API.
Head over to the Google Cloud Platform web console. You don’t need to sign in with the same Google account that you published the extension under, but I recommend doing so, so that everything is under the same account and is easier to find later.
3.1 Create a new Google API project. Name it whatever you want. As an example, if I was using Jenkins to do my CD, I might name the project jenkins-${extension name}-cd
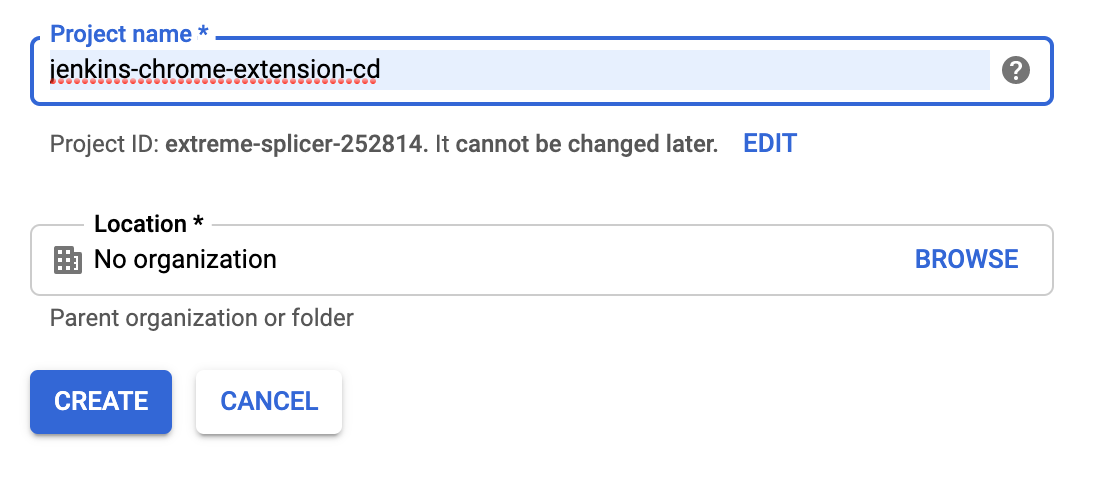
3.2 It will take a moment for the project creation process to finish, but once it’s done, you can select the project in the app header

Step 4: Create OAuth Credentials
Now we need to create a set of OAuth credentials that the process executing on our CD server can use to access the Chrome Web Store API.
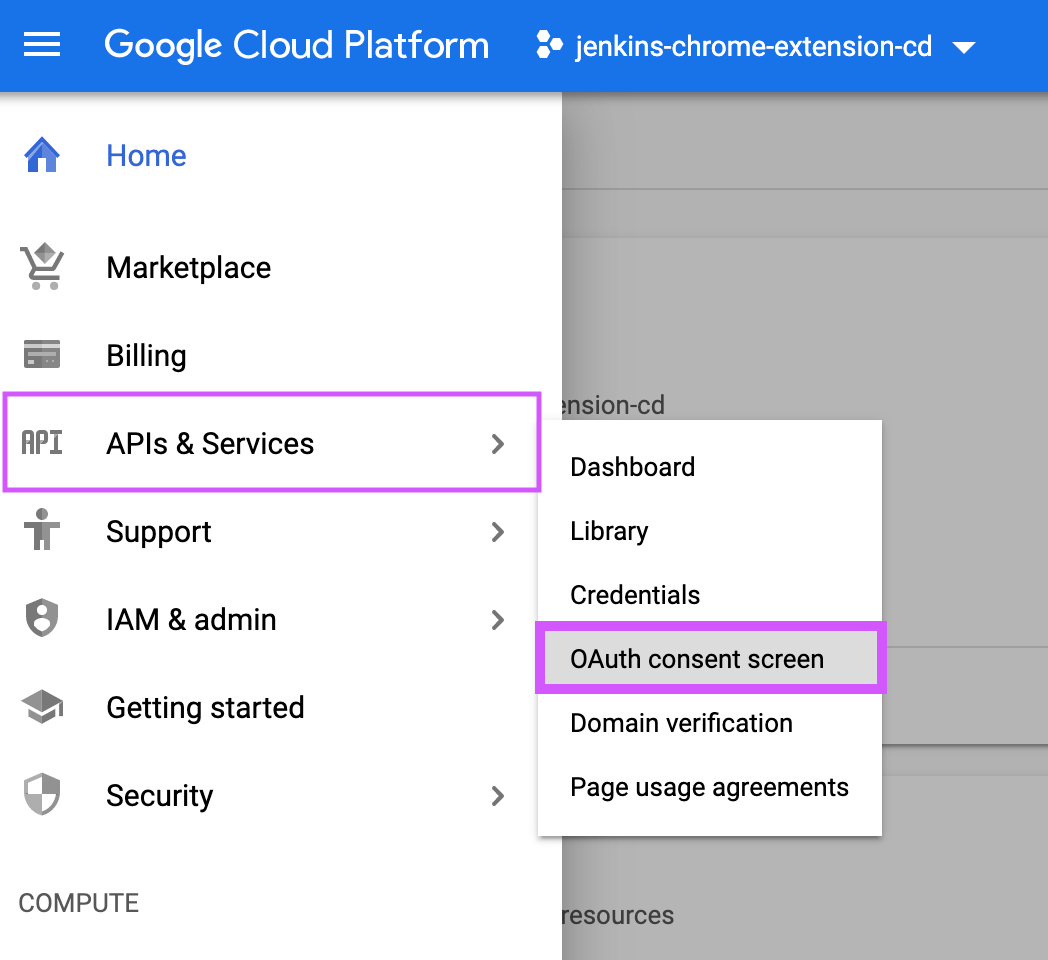
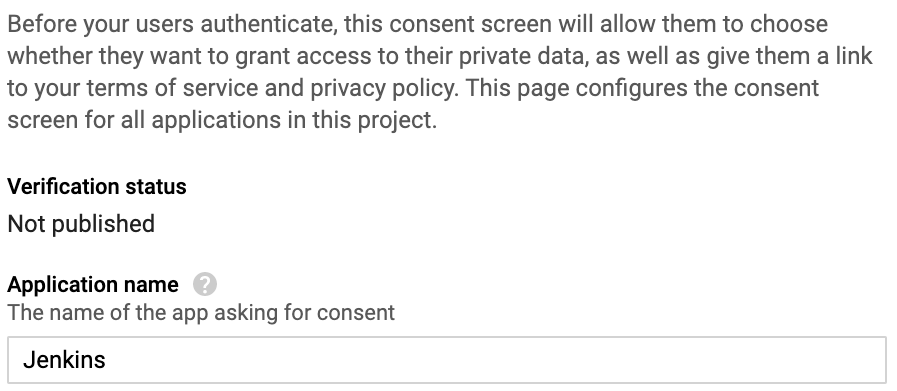
4.1 Before we can create our credentials, we’ll need to configure an OAuth consent screen. Navigate to the “OAuth consent screen” page in the “APIs & Services” section of the console.
The only field you need to fill out is the name field. I suggest using the name of whichever CD tool you’re using.
Save your changes, then navigate to the “Credentials” page to create a new OAuth client ID.
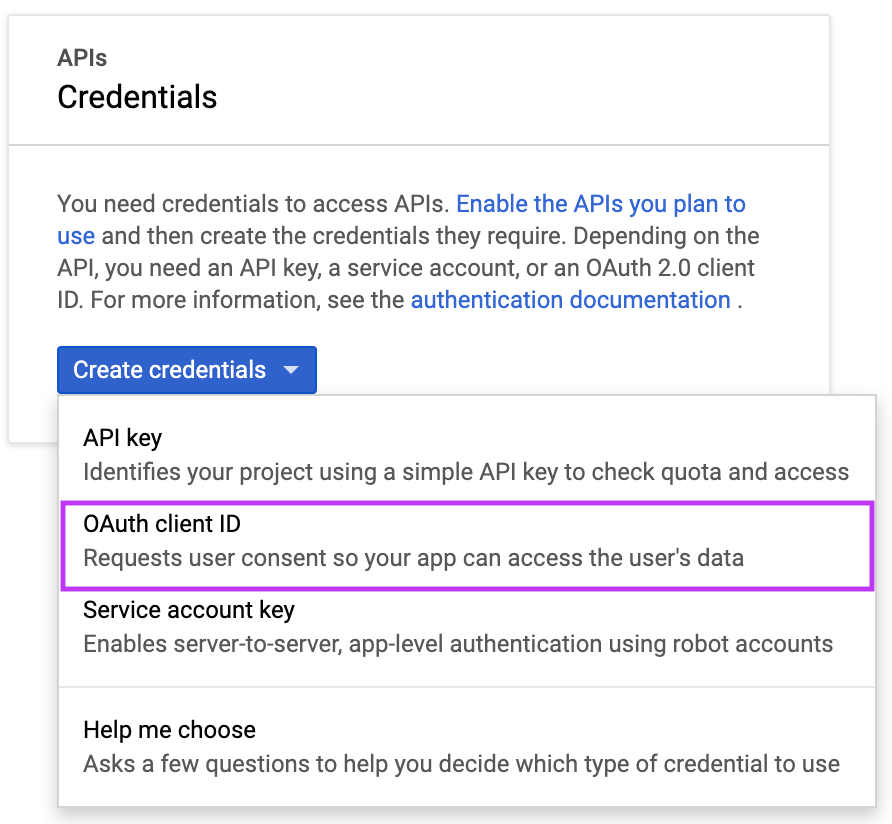
When prompted for “Application Type” choose “Other”. You can use the same value for the “Name” field that you used when configuring the consent screen.
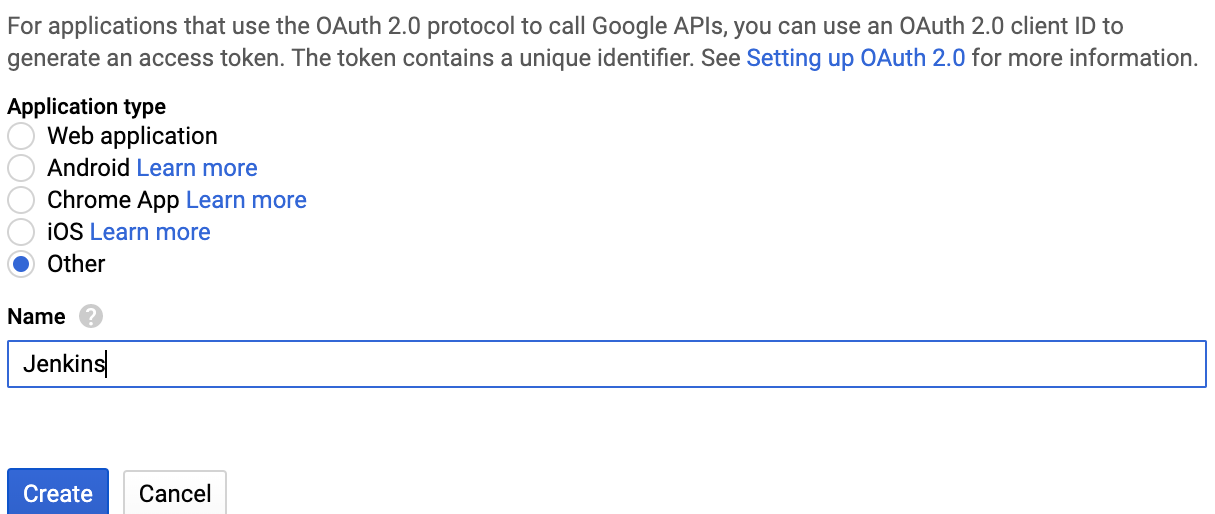
Great! Click “Create” and you’ll be provided with a client secret and a client ID. Save this information on your CD server.
Step 5: Get a Refresh Token
Now that we have a client secret and client ID, we can get a refresh token. Refresh tokens don’t expire, so we can store a refresh token on our CD server and use it to get fresh access tokens each time the CD process is invoked.
To get a refresh token, first visit the following URL in your web browser, replacing $CLIENT_ID with your OAuth client ID from the previous step. Make sure you’re signed in to Google using the same account that owns the chrome extension.
https://accounts.google.com/o/oauth2/auth?response_type=code&scope=https://www.googleapis.com/auth/chromewebstore&client_id=$CLIENT_ID&redirect_uri=urn:ietf:wg:oauth:2.0:oobYou’ll be presented with an authorization code. Copy it, along with your OAuth client secret and OAuth client ID into the following curl command:
curl "https://accounts.google.com/o/oauth2/token" -d \"client_id=$CLIENT_ID&client_secret=$CLIENT_SECRET&code=$CODE&grant_type=authorization_code&redirect_uri=urn:ietf:wg:oauth:2.0:oob"The OAuth server should send a reply along the lines of:
{
  "access_token" : "ya29...",
  "token_type" : "Bearer",
  "expires_in" : 3600,
  "refresh_token" : "1/rwn..."
}
Save the refresh token on your CD server.
Step 6: Set up the CD script!
Now we have 4 crucial pieces of information saved on our CD server:
- The extension’s ID
- An OAuth client ID
- An OAuth client secret
- An OAuth refresh token
If you store these values in environment variables, you can adapt the following bash script to upload and publish zip files. Note, this script requires jq be installed on your system. The script also assumes your zip file is named build.zip
ACCESS_TOKEN=$(curl "https://accounts.google.com/o/oauth2/token" -d "client_id=${CLIENT_ID}&client_secret=${CLIENT_SECRET}&refresh_token=${REFRESH_TOKEN}&grant_type=refresh_token&redirect_uri=urn:ietf:wg:oauth:2.0:oob" | jq -r .access_token)

curl -H "Authorization: Bearer ${ACCESS_TOKEN}" -H "x-goog-api-version: 2" -X PUT -T build.zip -v "https://www.googleapis.com/upload/chromewebstore/v1.1/items/${EXTENSION_ID}"

curl -H "Authorization: Bearer ${ACCESS_TOKEN}" -H "x-goog-api-version: 2" -H "Content-Length: 0" -X POST -v "https://www.googleapis.com/chromewebstore/v1.1/items/${EXTENSION_ID}/publish"
🎉 Bonus Tip #1: Sync your version numbers
If you try to upload a new zip, but the version number encoded in manifest.json has not changed, the Web Store API will not upload the zip and will return an error along the lines of:
{
  "error_code": "PKG_INVALID_VERSION_NUMBER",
  "error_detail": "Invalid version number in manifest: X.X.X. Please make sure the newly uploaded package has a larger version in file manifest.json than the published package: X.X.X."
}
Make sure you’re updating the manifest.json version string prior to invoking your CD script! If you’re using NPM, you’re probably already maintaining a version string in your app’s package.json file. I recommend updating your build script to copy the version string from package.json to manifest.json before exiting.
If you’re using Webpack to build your app, you can use CopyWebpackPlugin to achieve this pretty easily.
plugins: [
  ...,
  new CopyWebpackPlugin([{
    from: paths.appManifestSrc,
    to: paths.appManifestDest,
    transform: content => {
      const newContent = JSON.parse(content);
      newContent.version = packageJSON.version;
      return JSON.stringify(newContent, null, 2);
    }
  }])
]
🎉 Bonus Tip #2: Avoid continuously deploying branches that update frequently.
All extensions published in the Chrome Web Store undergo a “code review” process which takes some time. (Usually about an hour.) If you attempt to publish a new version of your extension while a review is in progress, your publish attempt will fail, returning an error along the lines of:
{
  "code": 400,
  "message": "Publish condition not met: You may not edit or publish an item that is in review."
}
There’s a variety of possible solutions to this issue:
- Only continuously deploy on a branch that updates infrequently
- Add retry logic to your CD script
- limit invocations of your CD script to e.g. once per day.
My preference is for the first because it’s the most simple. I actually use a dedicated branch and only push to it when I want to update the extension, but all project requirements are a little bit different, so your mileage may vary 🙃